
A sweater crocheted using only slip stitches, which create the look of garter stitch.

This is the basic “Sweater Spring Is Coming”, a simple yet eye-catching piece designed exclusively with the slip stitch, which perfectly imitates two-needle knitting. It’s ideal if you want to make a stylish basic garment with an interesting texture.
The inspiration behind this design came from an afternoon of shopping, when the neon green color in a Stradivarius store kept catching my eye.
Materials & abbreviations
Materials used
- 400 g (14 oz) of any fingering weight yarn (100 g / 400 m; 3.5 oz / 437 yd)
- 6 mm hook (US J-10), or the size needed to match the gauge swatch
- Stitch markers
- Scissors
- Yarn needle
- Measuring tape
- Netflix (to keep you entertained while you crochet 😄)
Abbreviations
- ch: chain
- sl st: slip stitch
- sl st-FLO: slip stitch worked in the front loop only
- sl st-BLO: slip stitch worked in the back loop only
The stitch: garter stitch in crochet
- The garter stitch in crochet is created by alternating:
- Right side: slip stitch in the front loop only (sl st-FLO)
- Wrong side: slip stitch in the back loop only (sl st-BLO)
Watch the video tutorial showing how to work this stitch (the video is in Spanish):
Construction
- Worked flat, from side to side.
- Two separate pieces, back and front, which are joined together. Then you continue with the sleeves, ribbing and neckline.
- Crochet loosely, without pulling tight.
Gauge and measurements
These measurements are for a size S, but you can easily adjust the size of the garment by adding or removing stitches or rows as needed. Gauge: 4 × 4 in (10 × 10 cm) = 17 stitches and 22 rows.
The pattern
Sweater body – back panel
- Start: Make a chain of 95 stitches.
- Row 1: Work 95 slip stitches (sl st).
- Row 2: Work 95 slip stitches in the back loop only (sl st-BLO).
- Row 3: Work 95 slip stitches in the front loop only (sl st-FLO).
- Rows 4–88: Repeat rows 2 and 3 until the rectangle measures 15.75 in (40 cm) long, or the length you want for your sweater.
Remember that at the end of every row you must turn your work and make a turning chain, which does not count as a stitch.
Sweater body – front panel
- Start: Same as the back panel: begin with a chain of 95 stitches.
- Work the rows the same way as the back panel up to row 77.
- Neckline shaping (from row 78):
- Mark the center of the work, leaving 27 stitches unworked.
- Row 78: Work 34 slip stitches in the back loop only (sl st-BLO) on the first side of the neckline.
- Row 79: Work 34 slip stitches in the front loop only (sl st-FLO).
- Rows 80–88: Repeat rows 78 and 79 until you reach a height of 15.75 in (40 cm).
- Opposite side of the neckline: attach the yarn on the other side of the neckline and repeat rows 78–88 to complete the front panel.
Joining the body and armholes
- Place the front and back panels together with right sides facing.
- Join the shoulders using slip stitches on the wrong side of the fabric.
- Place a marker 7 in (18 cm) down from the shoulder to mark the armhole.
- Join the sides of the sweater (except the armholes) with slip stitches on the wrong side.
Sleeves
The sleeves are worked in the round directly into the opening we left unsewn, with the garment right side out.
Close each round with a sl st in the first sl st of the previous round. Then turn your work and make 1 turning ch (does not count as a stitch).
Use markers to mark the first and last stitch of each row so you don’t lose your place.
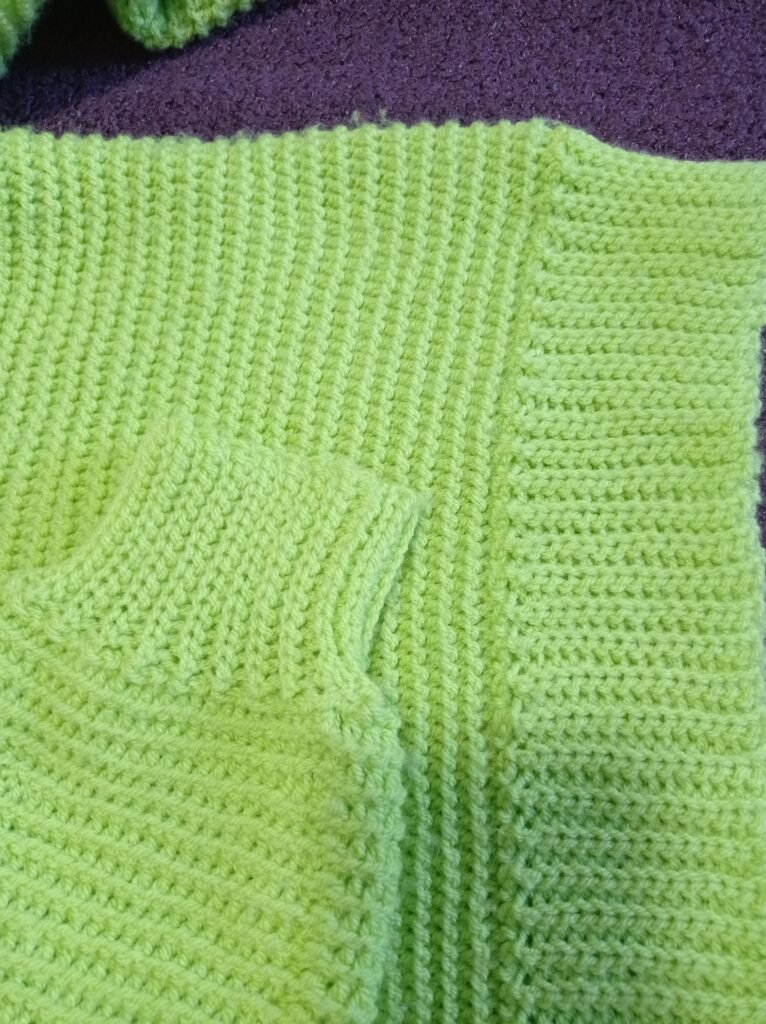
- With the garment right side out, attach the yarn at the bottom of the sleeve opening.
- Round 1: Distribute 60 slip stitches around the armhole opening (30 on the front and 30 on the back), working slip stitches in the back loop only (sl st-BLO).
- Round 2: Work slip stitches in the front loop only (sl st-FLO).
- Rounds 3–85: Alternate rounds 1 and 2 until you reach the desired length, in this case about 17.25 in (44 cm). Do not cut the yarn.
Cuffs
Worked in the round, crosswise (sideways), always in the back loop only.
*At the end of each round, turn your work and make a turning chain that does not count as a stitch. Start: After finishing the sleeve, ch 14 + 1 turning ch (adjust the number of chains if you want a longer cuff).
- Row 1: Work 14 slip stitches (sl st) along the chain. Slip stitch into the next 3 stitches of the sleeve.
- Row 2: Work 14 slip stitches in the back loop only (sl st-BLO) + 1 turning ch, and turn.
- Rows 3 onward: Repeat rows 1 and 2 until you have gone all the way around the sleeve.
- Join the two ends of the cuff with slip stitches on the wrong side.
Neckline
Worked in the round, crosswise (sideways), always in the back loop only.
*At the end of each round, turn your work and make a turning chain that does not count as a stitch.
Start: Attach the yarn at one of the shoulder seams and distribute 64 slip stitches around the neckline, very loosely.

- Row 1: Ch 6 (adjust to the neckline height you want) + 1 turning ch.
- Row 2: Work 6 slip stitches in the back loop only (sl st-BLO), then slip stitch into the next 2 stitches of the neckline.
- Rows 3 onward: Repeat rows 1 and 2 until you have gone all the way around the neckline.
- Join the two ends of the neckband with slip stitches on the wrong side.
Waistband ribbing
Worked in the round, crosswise (sideways), along the starting chains of the front and back panels, always in the back loop only.
*At the end of each round, turn your work and make a turning chain that does not count as a stitch.
- Start: Attach the yarn at the right side of the sweater body.
- Row 1: Ch 14 + 1 turning ch (adjust the number of chains if you want wider ribbing) and work 14 slip stitches.
- Slip stitch into the next 2 stitches of the body.
- Row 2: Work 14 slip stitches in the back loop only (sl st-BLO), turn.
- Rows 3 onward: Repeat rows 1 and 2 until you have gone all the way around the waist.
- Join the two ends of the ribbing with slip stitches on the wrong side.
Final tip

This sweater is perfect for customizing. If you want it more fitted or longer, just adjust the chains or rows at the beginning.
It’s an incredibly versatile and eye-catching garment, ideal for any time of year. I hope you enjoy crocheting this design as much as you’ll enjoy wearing it!