
The crochet mesh hat is the trend you won’t want to take off!
FREE PATTERN WRITTEN STEP BY STEP, CHART AND VIDEO TUTORIAL (English video available)
Hi, crocheter!
If you’ve been following social media and what’s trending in the crochet world, you’ve surely seen it already: the crochet casquete, or mesh hat, is everywhere. And no wonder, because it’s an incredibly versatile, easy-to-crochet accessory with a retro touch that charms everyone.

I’ll confess I was reluctant to wear this kind of accessory, but once I started crocheting it I gave in, and I’m delighted. Now I catch myself trying on combinations of clothes from my closet to make the mesh hat an essential part of the outfit.

It doesn’t matter whether you call it a casquete, a mesh cap or an openwork fisherman hat; the essence is the same: a light, airy design that’s perfect for any season. Unlike a traditional wool hat, this type of hat not only protects you from the sun, it also gives a bohemian, casual touch of style to any outfit.

My Version of the Mesh Hat: Your Next Project
As you know, I love experimenting with patterns and designs, and this project was no exception.
I’ve created a super complete video tutorial with my own version of this trendy hat, and I promise it’s designed to be a fun, rewarding project.
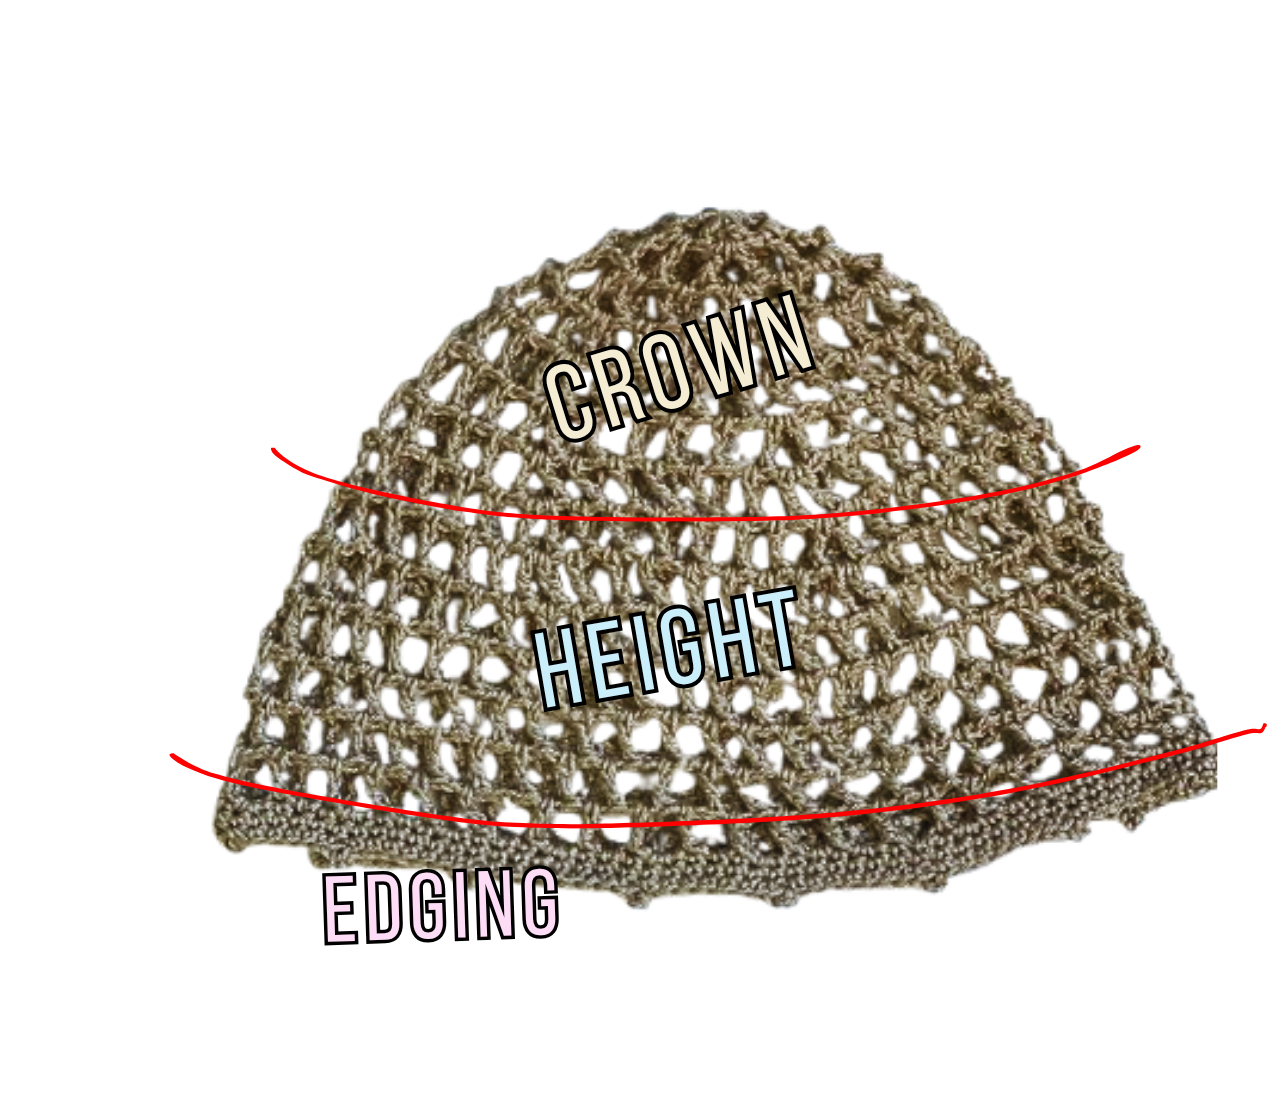
The video includes all the instructions so that, step by step, you can crochet your own mesh hat. It’s divided into three essential parts:
1.- The crown, where I explain how to make increases so that it grows evenly
2.- The height, with no increases, where we make our little hat a bit taller
3.- The edging, the most special detail of your Mesh Hat. I looked for the perfect combination of stitches to achieve that characteristic mesh effect, without making it complicated for anyone.

This edging, finished with little points, or picot stitches, adds a subtle, original detail.
I’ve also prepared lots of tips so the result is flawless, from choosing the yarn to adjusting the fit with three different sizes so that it suits you perfectly.
Whether you want it in a neutral color to go with everything or in a vibrant shade to stand out, the crochet mesh hat is a perfect opportunity to let your imagination run wild. It’s an accessory that crochets up fast, ideal if you’re looking for a project with immediate results.
You can watch the video tutorial right now on my YouTube channel (the video has English audio):
But if you’re one of those crocheters who prefer written instructions and charts when following a pattern…
I’ve also prepared the written step-by-step and the chart for you, so you can crochet it without needing to watch the video tutorial.
Let’s get to it:
MATERIALS
- Yarn: 50 g / 175 m (1.75 oz / 191 yd) of the new Veggie acrylic yarn by Casasol, fingering weight (100 g / 360 m; 3.5 oz / 394 yd). I used the dry-leaf green, color no. 483. They have a wide color range, each one prettier than the last. I recommend using acrylic yarn because it doesn’t give with wear as much as cotton does.
- 3 mm (US D-3) crochet hook.
- A stitch marker.
- Scissors.
- Tapestry needle, just to weave in 2 little yarn tails.
- Measuring tape.

BEFORE YOU START
You don’t need to match any gauge. Crochet with the yarn you like best and a hook size that feels comfortable.
The turning chains at the beginning of each round count as the first stitch.
We’ll crochet in the round without turning.
ABBREVIATIONS:
ch – chain
dc – double crochet
tr – treble crochet
inc – increase: 1 tr, ch 2, 1 tr, ch 2 in the same ch-2 space
sl st – slip stitch
sc – single crochet
picot – picot stitch (1 sc, ch 3, 1 sl st in the first ch)
next sp – next ch-2 space
next tr – next treble crochet
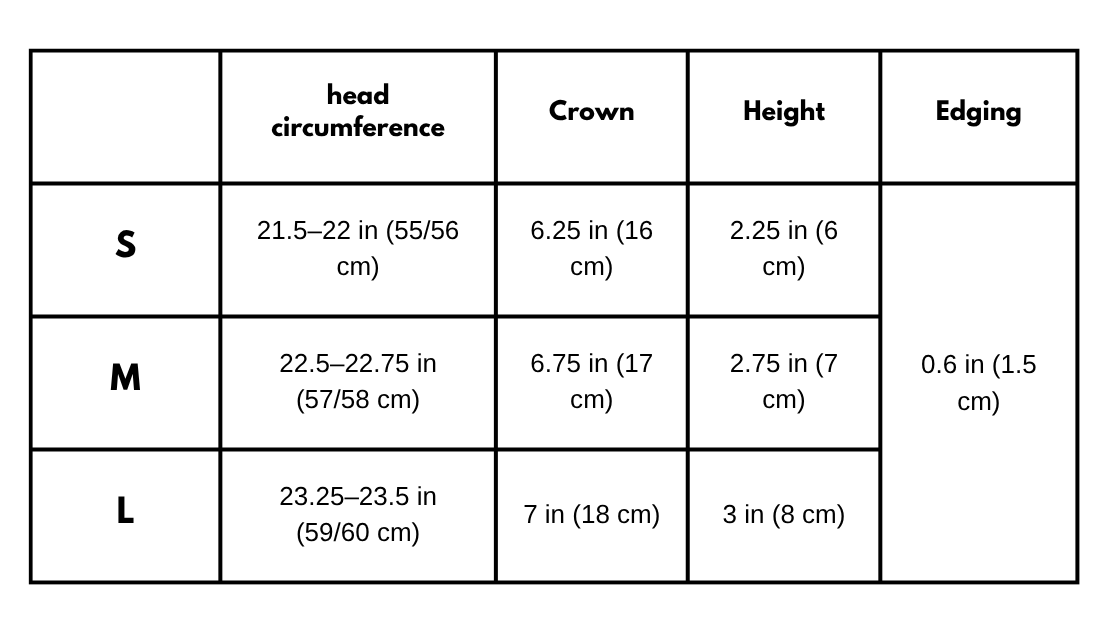
SIZES by head circumference
S: 21.5–22 in (55/56 cm)
M: 22.5–22.75 in (57/58 cm)
L: 23.25–23.5 in (59/60 cm)
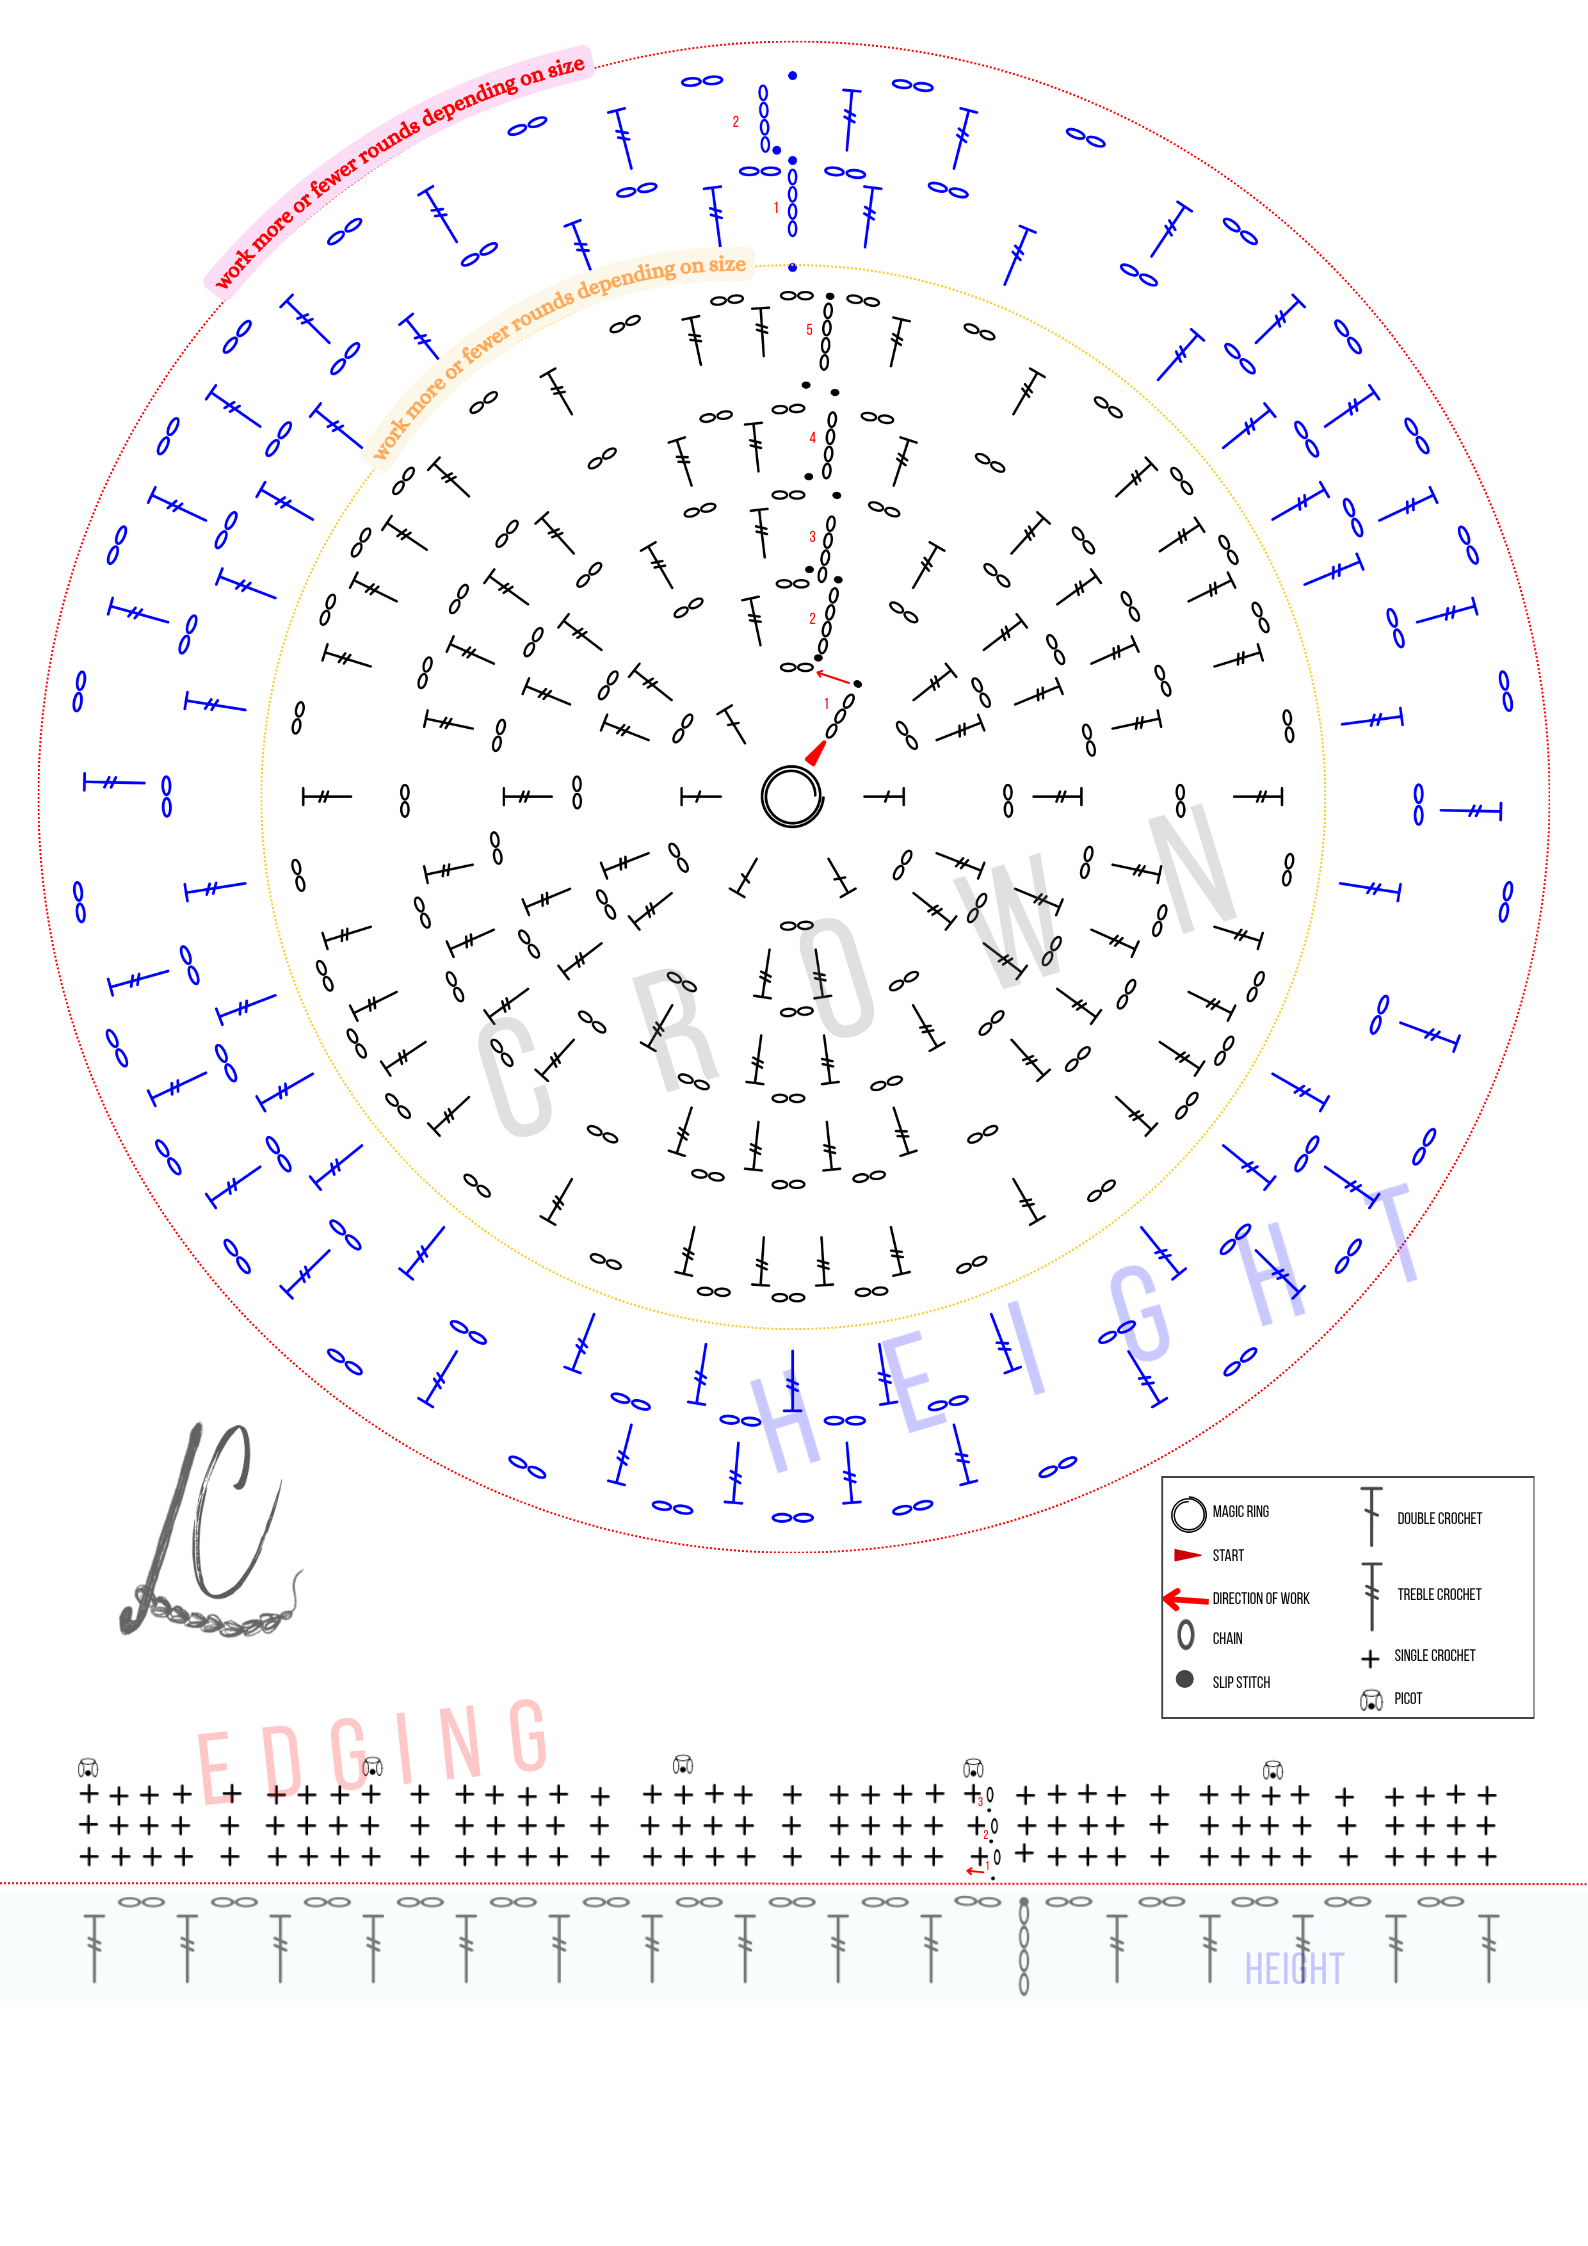
CHART
WRITTEN STEP BY STEP
Part 1.- CROWN
This part is crocheted by working increases of treble crochet stitches separated by 2 chains.
Magic ring
Round 1: ch 5, [1 dc, ch 2] repeat [ ] 5 more times. Close with a sl st in the 3rd ch and slip stitch into the next ch-2 space.
Round 2: ch 6, 1 tr, ch 2 in the same space. 1 inc in each of the ch-2 spaces to the end of the round. Close with a sl st in the 4th ch and slip stitch into the next ch-2 space.
Round 3: ch 6, 1 tr, ch 2 in the same space. [1 tr, ch 2 in the next sp, 1 inc in the next sp]. Repeat [ ] to the end. Close with a sl st in the 4th ch and slip stitch into the next ch-2 space.
Round 4: ch 6, 1 tr, ch 2 in the same space. [1 tr, ch 2 in each of the next 2 sps, 1 inc in the next sp]. Repeat [ ] to the end. Close with a sl st in the 4th ch and slip stitch into the next ch-2 space.
Round 5: ch 6, 1 tr, ch 2 in the same space. [1 tr, ch 2 in each of the next 3 sps, 1 inc in the next sp]. Repeat [ ] to the end. Close with a sl st in the 4th ch and slip stitch into the next ch-2 space.
Round 6: ch 6, 1 tr, ch 2 in the same space. [1 tr, ch 2 in each of the next 4 sps, 1 inc in the next sp]. Repeat [ ] to the end. Close with a sl st in the 4th ch and slip stitch into the next ch-2 space.
Round 7: ch 6, 1 tr, ch 2 in the same space. [1 tr, ch 2 in each of the next 5 sps, 1 inc in the next sp]. Repeat [ ] to the end. Close with a sl st in the 4th ch and slip stitch into the next ch-2 space.
Round 8: ch 6, 1 tr, ch 2 in the same space. [1 tr, ch 2 in each of the next 6 sps, 1 inc in the next sp]. Repeat [ ] to the end. Close with a sl st in the 4th ch and slip stitch into the next ch-2 space.
Continue the sequence (if necessary) to reach the crown diameter specified for each size:
Rnd 1: 6 dc
Rnd 2: 6 inc
Rnd 3: 1 inc, 1 tr
Rnd 4: 1 inc, 2 tr
Rnd 5: 1 inc, 3 tr
Rnd 6: 1 inc, 4 tr
Rnd 7: 1 inc, 5 tr
Rnd 8: 1 inc, 6 tr
Rnd 9: 1 inc, 7 tr
Rnd 10: 1 inc, 8 tr
Etc.
Crown diameter you should reach, by size:
S: 6.25 in (16 cm)
M: 6.75 in (17 cm)
L: 7 in (18 cm)
Part 2.- HEIGHT
This part is crocheted without increases. Start a new round count.
Round 1: ch 6, 1 tr in the next sp, ch 2. Repeat to the end. Close with a sl st in the 4th ch and slip stitch into the next ch-2 space.
Rounds 2 – until you reach the height specified for each size: Repeat round 1.
S: 2.25 in (6 cm)
M: 2.75 in (7 cm)
L: 3 in (8 cm)
Part 3.- EDGING
The edging consists of three rounds of single crochet, and in the last round we work the picot stitch at intervals. Start a new round count.
Round 1: ch 1 (turning chain, doesn’t count as a stitch), 1 sc in the same space, [1 sc in the next tr, 1 sc in the next sp, 1 sc in the next tr, 2 sc in the next sp]. Repeat [ ] to the end. Close with a sl st in the first sc.
Round 2: ch 1 (turning chain, doesn’t count as a stitch), 1 sc in each stitch around. Close with a sl st in the first sc.
Round 3 (Picot Round):
First count the total number of stitches in round 2 and find the divisors of that number to choose how often to space your picot stitches. Example: in round 2 of the edging of my mesh hat there are 120 stitches, which is divisible by 3, 4, 5, 6, 8, 10… I chose the number 8 for my picots. That is, I make one picot every 8 stitches.
Ch 1 (turning chain, doesn’t count as a stitch), [1 picot, 7 sc]. Repeat [ ] to the end. Close with a sl st at the base of the first picot. Cut the yarn and weave in the end.
End of the written pattern.
Don’t miss out and join the trend! I’m sure that once you have your mesh hat, you won’t want to stop wearing it.
Oh, and make a note of one more idea: since you’ll crochet it so fast, how about giving one to your friends? You know, with crochet, life is better.

Happy Crocheting!
You might also like…

Crochet Snowflakes with Lots of Sparkle: Free Pattern

Crochet Mesh Hat! Free Pattern, Chart and Video Tutorial

Komorebi Kimono – Can You Crochet Light?

Irresistible Crochet Flower-Choker : Make the Perfect Choker Step by Step with a Free Pattern
Aruba Cardigan Crochet: A Stunning Design to Crochet and Enjoy
