

Crochet Flower-Choker : A Delicate Accessory You Can Make Yourself
The Flower-Choker is not just an accessory; it’s a special piece you can create with your own hands to add femininity, elegance and a handmade touch to any look. Whether for a special event, a casual outing or as a handmade gift, this design will become your new favorite.
In this post, I’m going to guide you step by step so you can create your own flower choker, a delicate design full of personality that is sure to turn heads. I’ll also share tips, tricks and details about materials, measurements and customization.
What Is a Choker and Why Is It So Trendy?
A choker is a close-fitting necklace that sits snug around the neck. It’s a classic that always comes back, and it’s trendier than ever right now, especially in crocheted versions. It’s the perfect accessory to elevate any outfit, adding a touch of sensuality and originality.
I’ve seen them in stores like Pull & Bear and Parfois, but why buy one when we can make it with our own hands? Crochet gives us that wonderful possibility: turning an idea into something tangible, made to measure and with lots of love. That’s why I designed this pattern, so you can have a unique, special choker too.
Materials You’ll Need for the Crochet Flower-Choker
One of the best things about this project is that you can use leftover yarn you already have at home. You only need small amounts of yarn and a few basic tools:
White Flower:
- 10 g of Casasol Mohair yarn (lace weight). Use a double strand to give the petals firmness.


Black Flower:
- 15 g of Casasol Merino Superwash wool (fingering weight). Crochet with a single strand.


- Essential tools :
- 3.5 mm (US E-4) crochet hook
- Stitch markers
- Scissors
- Tapestry needle
- Measuring tape
Tip: For your flower’s petals to keep their shape, choose a yarn that is firm but soft.
Flower-Choker Measurements
- Flower: 2.75 in (7 cm) in diameter with 21 petals.
- Cord: 59 in (1.5 m) long.
Step by Step: How to Crochet Your Flower-Choker
This pattern is designed so crocheters of all levels can enjoy making it. In addition to the written instructions, it includes charts and video tutorials so you don’t miss a single detail.
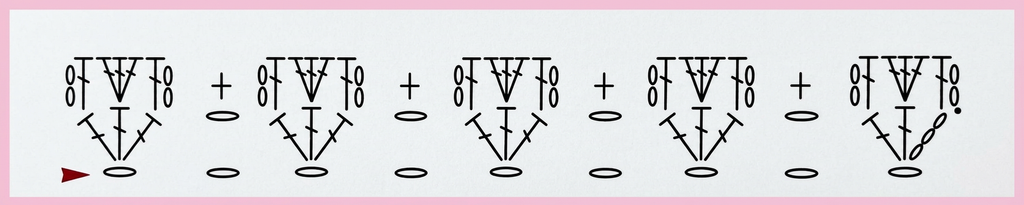
How to Crochet the Flower
Crochet your flower with a hook half a size smaller than recommended. Starting chain: an odd number (a multiple of 2 + 1): each petal will take up 2 ch.
- Row 0: Leave a long tail at the beginning (about 8 in/20 cm) and ch 43.
- Row 1: Ch 3 (counts as first dc), 2 dc in 4th ch from hook, *ch 1, skip 1 st, 3 dc in next st*. Repeat * to the end. Total: 87 sts.
- Row 2: *Ch 2, 1 dc in first st, 3 dc in next st, 1 dc in next st, ch 2, 1 sc in the ch-1 space of the previous row*. Repeat * to the second-to-last petal. Last petal: ch 2, 1 dc in first st, 3 dc in next st, 1 dc in last st, ch 2, close with a sl st in the same st where you made the last dc. Fasten off leaving a long tail. Total: 21 petals.
How to Assemble the Flower
Roll the strip around itself starting from the beginning, shaping it into a flower. Leave the initial yarn tail underneath, then thread it onto a tapestry needle and secure the center of your flower. Finally, thread the other yarn tail and secure the petals.
🎥 Watch my complete video tutorial here (English audio available)
How to Make the Choker Cord

The cord isn’t crocheted; you make it with your hands, and the result looks very professional. Once you learn it, you’ll want to use it in other projects. For example, I used it to tie the bottom of my Vainilla Sweater, one of my first patterns.
Here’s how to do it:
Cut 3 strands of yarn, each 10 ft (3 m) long.
Hold one end firmly with a clip, then go to the other end and twist all the strands together in the same direction until they start to want to fold in half and form the cord by themselves.
Now join the two ends together and tie them in a knot. Trim the ends, leaving little tassels.
Don’t tie the knot at the other end yet.
First, using a thick tapestry needle, pass the cord through the back of your flower.
Now you can tie the knot and trim the ends, leaving little tassels as you did before.

🎥 Watch the cord video tutorial here (English audio available)
Customize Your Flower-Choker
One of the advantages of this pattern is that I explain how you can easily adapt it to other measurements:
- Make the flower bigger with more petals: Add more stitches to the starting chain.
- Make the cord longer and thicker: Use more strands.
In the PDF you can download here, you’ll find detailed instructions for making these modifications (the PDF is currently available in Spanish).
A Handmade Gift That Never Fails
The Flor Choker is such a quick, easy project that you’ll want to make more than one. I crocheted several to give to my friends during a trip to Seville, and it was a huge success. Each one showed off a handmade choker, and the gesture couldn’t have been more special.
Handmade accessories like this have a unique value you won’t find in stores. They’re personal, special and perfect for any occasion.

Share Your Creation on Social Media
If you decide to crochet your own Flower-Choker, I’d love to see it. Use the hashtag #FlowerChoker and tag me @lanamalacrochet so I can celebrate every stitch with you. I can’t wait to see your versions and share them with the crochet community!
More Crochet Patterns and Tutorials
Did you like this project? Then I invite you to discover more patterns on my blog Lana Mala Crochet. There you’ll find ideas for all levels, from accessories to garments and gift projects.
This Flowwer-Choker is perfect for practicing basic stitches and improving your tension. Take your time, enjoy the process and, above all, have fun creating something unique with your hands.
See you soon.
Happy Crocheting!!!
Ana.