
Why Xanath?
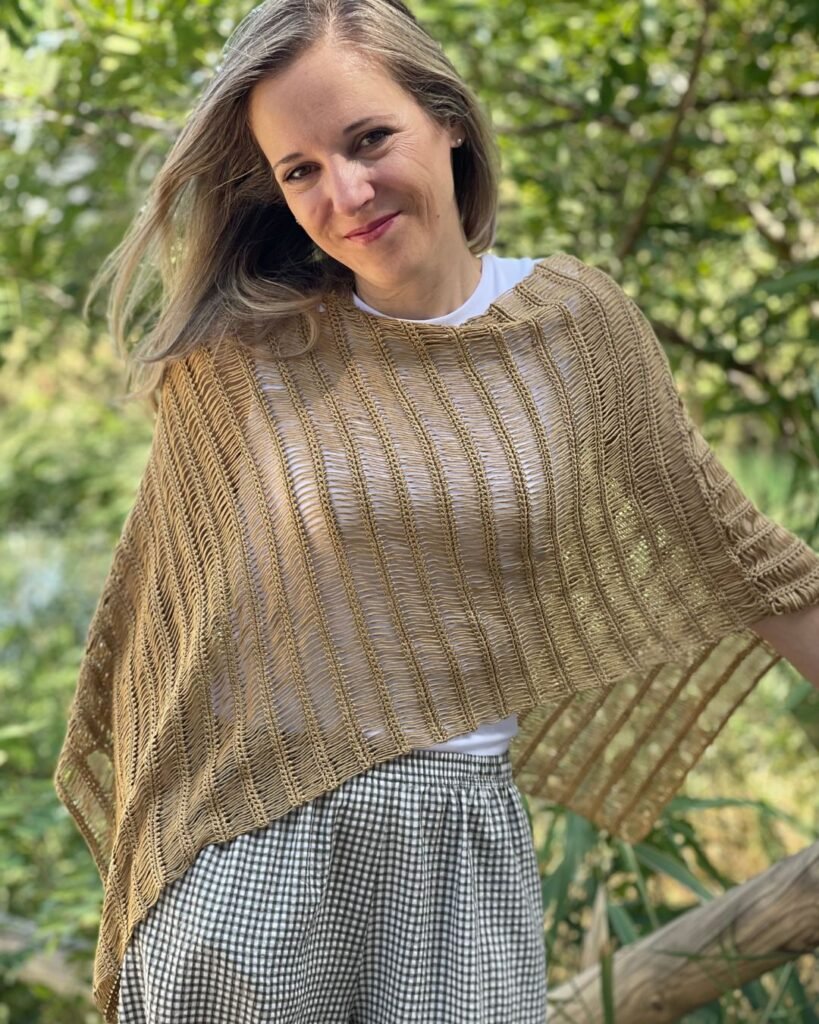
Sometimes a design finds its name almost the moment it is born. Other times the name arrives at the end of the journey… just when everything begins to make sense.
It all started thanks to my friend Sonia Rico, known on Instagram as @miganchillo. Some time ago she asked me to design a shawl or a scarf using the Vanilla Stitch. She said my collection was missing a piece like that.
The Vanilla Stitch is precisely what brought us together as crochet friends for life. It starred in some of my first patterns: the Aruba Kimono, the Vainilla Sweater and, later, the Aruba Cardigan.
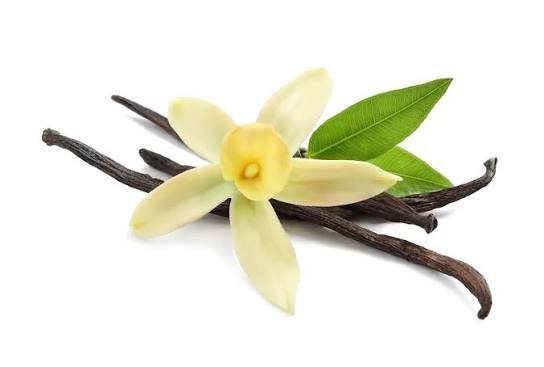
One day she told me she had the perfect name for the next design I made with this stitch: Xanath, a word of Totonac origin that means “vanilla flower”.
And of course I listened to Sonia and got to work.
But let me tell you a little more about where this name comes from.
Legend has it that Xanath was a young woman of noble birth, destined to devote her life to the temple. But her heart chose another path and she fell in love with a young farmer. They decided to run away together to live their love freely, but they were chased and, before they could escape, both lost their lives.
The legend says that, where Xanath’s blood fell, a delicate orchid bloomed. In time, that flower would give rise to vanilla, becoming forever a symbol of love, beauty and hope.
I don’t know whether this story really happened. We will probably never know.
But I love to think that, many centuries ago, the first vanilla flower was born from a love story. And today that same flower gives its name to the fourth design in a collection that is very special to me.
Isn’t that beautiful?
Before vanilla was known for its aroma, what caught people’s attention was its flower: delicate, elegant and surprisingly short-lived. It stays open only a few hours, as if reminding us that the most intense beauty is often found in small moments that, if we don’t stop, pass almost without us noticing.
And I thought… doesn’t something similar happen when we crochet?
We live in such a hurry that we sometimes forget to enjoy the journey. Yet when we pick up a ball of yarn and a hook, time seems to change its pace. Every row invites us to be present, to enjoy that small moment we give ourselves, which, once the project is finished, becomes a memory woven stitch by stitch.
That was when I knew. Sonia was right. This poncho could only be called Xanath.
The yarn that makes the difference
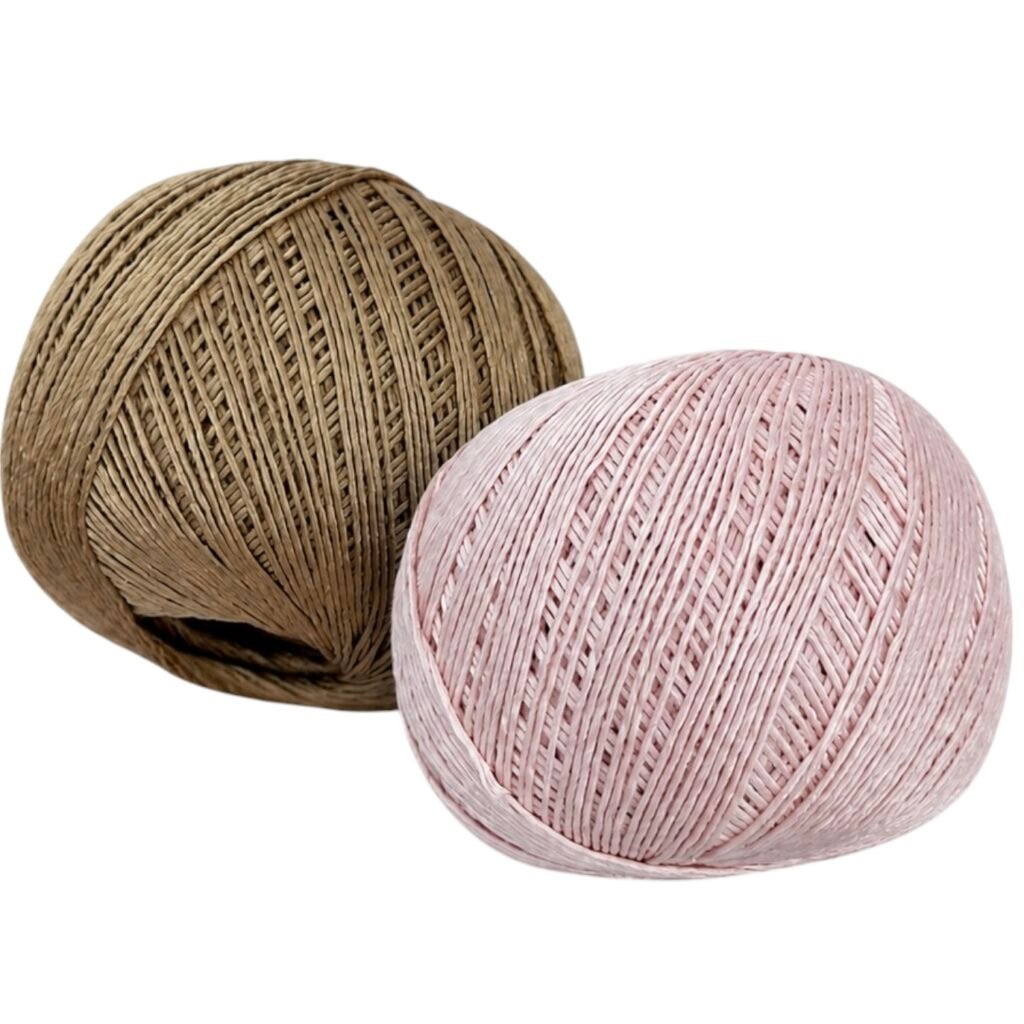
A yarn had landed in my hands that was so beautiful, so special: LUXURY by Casasol
A blend of silk and cupro that Casasol had sent me to try. It wasn’t even on sale yet, it was brand new. As soon as I received it I knew it was the perfect yarn for what I had in mind with the vanilla stitch… That subtle silk sheen, that movement and drape, glides off the hook so smoothly…
Here are all the details from the spec sheet:
The elegance of silk. The lightness of cupro. Surprisingly affordable luxury.
LUXURY combines 50% Mulberry Silk and 50% Bemberg™ Cupro, two of the most prized fibers in the textile world. An exclusive blend that offers the feel, drape and sheen of a high-end yarn at a price far more accessible than 100% silk.
- Mulberry silk comes from silkworms fed exclusively on mulberry leaves. This produces long, even fibers that are very soft, shiny and strong, considered the finest natural silks on the market.
- Bemberg™ Cupro is a premium fiber made from the inner part of the cotton plant (the linters), which has not been exposed to sunlight. Made by the Japanese company Asahi Kasei, it stands out for its extraordinary softness, lightness, excellent drape and a feel very similar to silk.
The perfect combination: Mulberry silk brings sheen and softness, and Bemberg™ Cupro adds fluidity and freshness. Together they create a sophisticated yarn with exceptional drape and an incomparable feel, for garments where touch and drape make all the difference.
LUXURY highlights:
- High-quality natural fibers
- Extraordinarily soft and silky feel
- Elegant natural sheen
- Excellent drape and fluidity
- Limited edition in two colors: hazelnut and flower
Spec sheet:
- Composition: 50% Mulberry Silk – 50% Bemberg™ Cupro
- Weight and length: 50 g (1.75 oz) / 150 m (164 yds)
- Recommended hooks / needles: 3–4 mm
- Care: hand wash, dry flat. We recommend blocking this yarn.
- Made in Spain 🇪🇸
And my creativity went to work. I had the yarn, I had the stitch and I had the name.
The texture
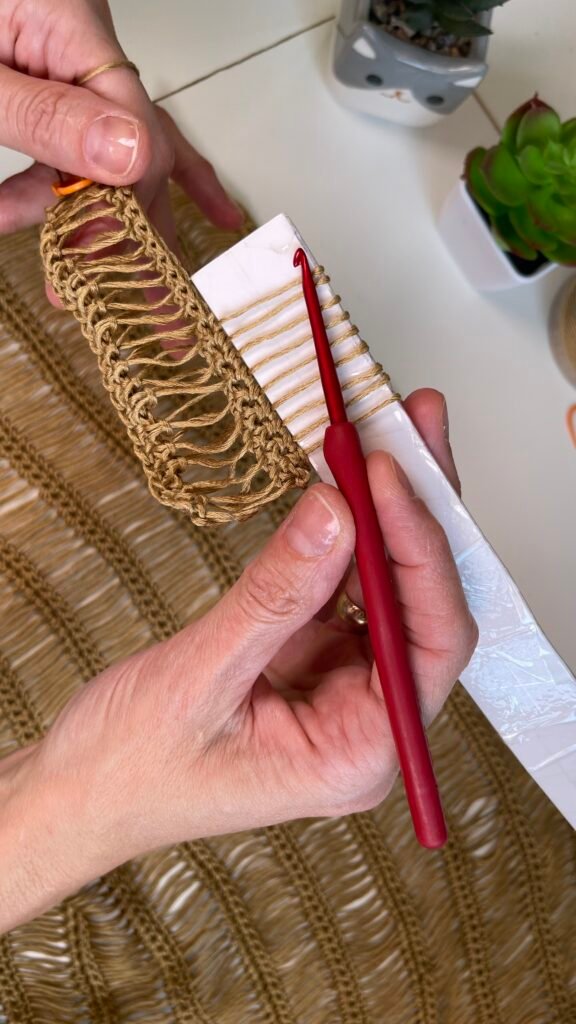
I started shaping the texture. I like shawls, ponchos and scarves to have reversible textures, so you don’t have to stop and think about how to wear them: you put it on, take it off when you walk into work or a restaurant… and tuck it in your bag. When you want it again… you pull it out and, voilà! It looks lovely whichever way it falls.
So I decided to alternate rows of vanilla stitch with 2 rows of single crochet, so that it looks the same on both sides.
The construction
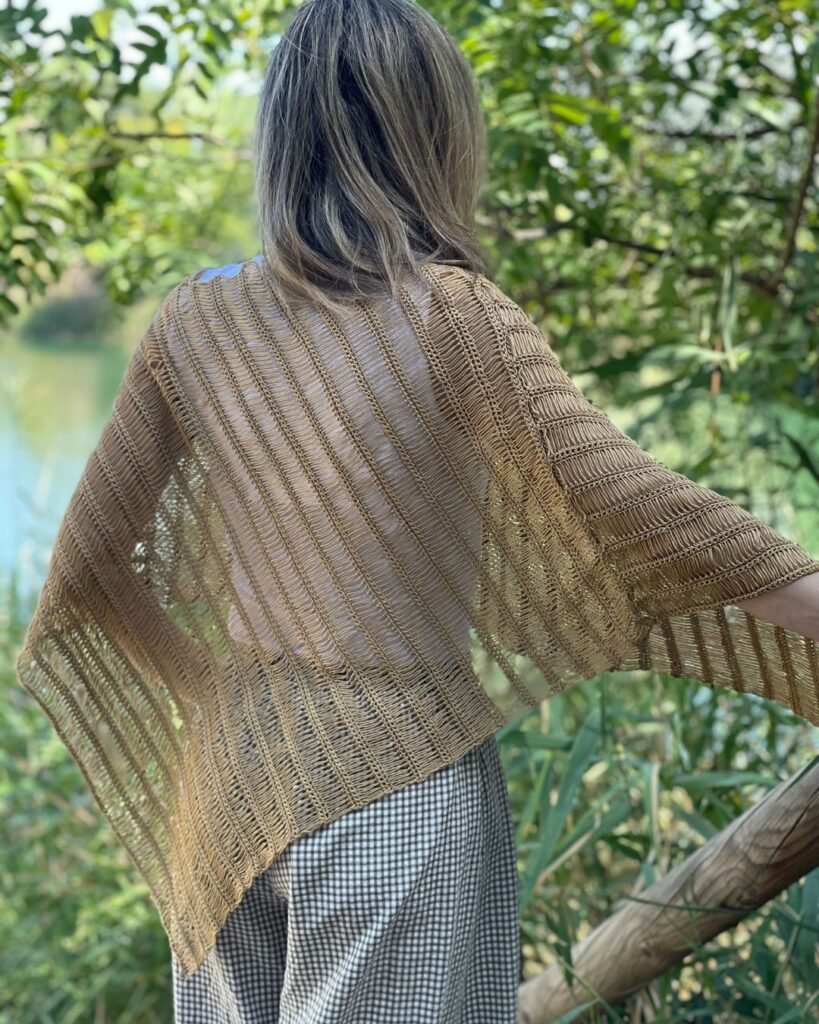
I didn’t want the typical crochet poncho that just sits on the shoulders. I created an asymmetrical construction from 2 rectangles, an apparently simple structure that, thanks to the way the pieces are joined, creates an elegant silhouette with a spectacular drape. The seam is also decorative and worked with your own hook, so the finish becomes one more element of the design.
FROM HERE THE TUTORIAL BEGINS…
I have prepared this pattern with so much love so you can enjoy the process from the first stitch to the last.
You will find step-by-step explanations, video tutorials, charts and diagrams to accompany you throughout the project.
I only hope one thing: that when you wear your Xanath Poncho you remember not only the garment you made, but also every one of those quiet moments you gave yourself while making it.
Because, in the end, that is the most beautiful thing about crochet: the stories we weave between stitches.
I would love to see your Xanath Poncho made in your own style. Don’t forget to share it on social media and tag me. You can also leave a comment here on this post. I love reading you.
MATERIALS
- 220 g / 660 m (7.8 oz / 722 yds), 5 balls of LUXURY by Casasol: 50% Mulberry Silk and 50% Bemberg™ Cupro, 50 g / 150 m (1.75 oz / 164 yds) each. Sport weight. Color hazelnut (avellana).
You can use any other yarn you like as long as it has the same weight and yardage, so you can follow the written pattern and get the measurements given. I also recommend a yarn with drape and movement, such as silk, bamboo, linen, natural alpaca or merino wool…
If you decide to use a yarn of a different weight and yardage, follow the measurements in centimeters/inches given in the pattern, not the number of stitches or rows.
- 3 mm (D-3) crochet hook (US terms)
- A piece of cardboard or a ruler about 3 cm (1.2 in) wide and 20 cm (8 in) long
- Stitch markers
- Tapestry needle for weaving in ends
- Scissors
- Padded surface for blocking the pieces before joining
- Pins or blocking wires
STITCHES USED AND ABBREVIATIONS (US TERMS)
ch: chain – Yarn over and pull the yarn through the loop on your hook.
sc: single crochet – Insert your hook in the stitch, yarn over and pull up a loop. You will have 2 loops on the hook. Yarn over again and pull through both loops at once.
vs: vanilla stitch – *Work 1 sc in the stitch, stretch the loop and place it over the cardboard. Take your hook out and adjust the loop slightly, without tightening it*. Repeat from * to * in every stitch of the row.
GAUGE
For this design you don’t need to match my gauge. But if you want your poncho to have the same dimensions as mine, then you should come close to it, without obsessing: 1 to 3 stitches or rows more or less than my gauge is acceptable, and the final measurements of the poncho will only be slightly different.
Gauge swatch worked in the poncho texture and blocked:
10 x 10 cm (4 x 4 in) = 21 sc and 3 groups of vs.
Step by step to work your gauge swatch in the Xanath poncho texture:
NOTE: “Ch 1, turn” means that this chain is a turning chain and is only used to turn. It does not count as a stitch.
GAUGE SWATCH
Row 0 (start): ch 25, ch 1, turn.
Row 1: sc 25, turn.
[Row 2: vs 25, ch 1, turn.
Row 3: sc 25 (locking row for the vanilla stitches), ch 1, turn.
Row 4: sc 25, turn.]
Row 5: vs 25, ch 1, turn.
Row 6: sc 25 (locking row for the vanilla stitches), ch 1, turn.
Row 7: sc 25, turn.
Row 8: vs 25, ch 1, turn.
Row 9: sc 25 (locking row for the vanilla stitches), ch 1, turn.
Row 10: sc 25, turn.
Row 11: vs 25, ch 1, turn.
Row 12: sc 25 (locking row for the vanilla stitches), ch 1, turn.
Row 13: sc 25, turn.
Row 14: vs 25, ch 1, turn.
Row 15: sc 25 (locking row for the vanilla stitches), ch 1, turn.
Row 16: sc 25, turn.
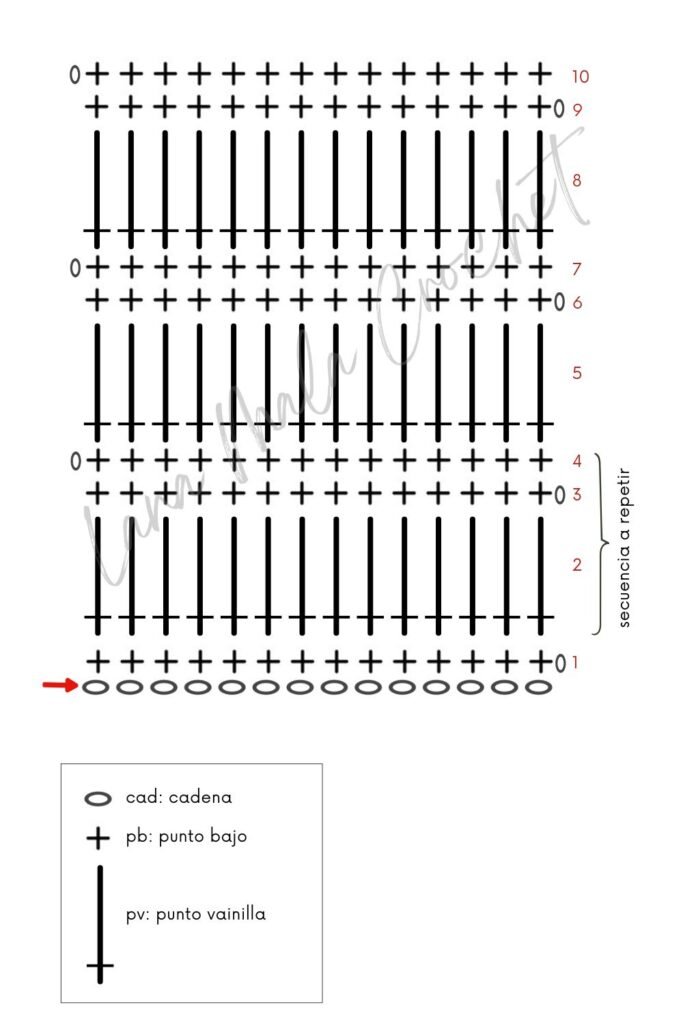
If you look closely, I have marked the sequence you always repeat between [ ]: rows 2, 3 and 4.
You will see that one vanilla stitch row alternates with two single crochet rows: the vanilla stitch is worked once on an even row and the next time on an odd row, which creates a reversible texture.
Look at the chart below; it is just a small sample of how to work this texture:
And, so you have no doubts, here is the video tutorial to learn this stitch step by step with all my tricks and tips. You’ll see how quick and easy it is.
MEASUREMENTS
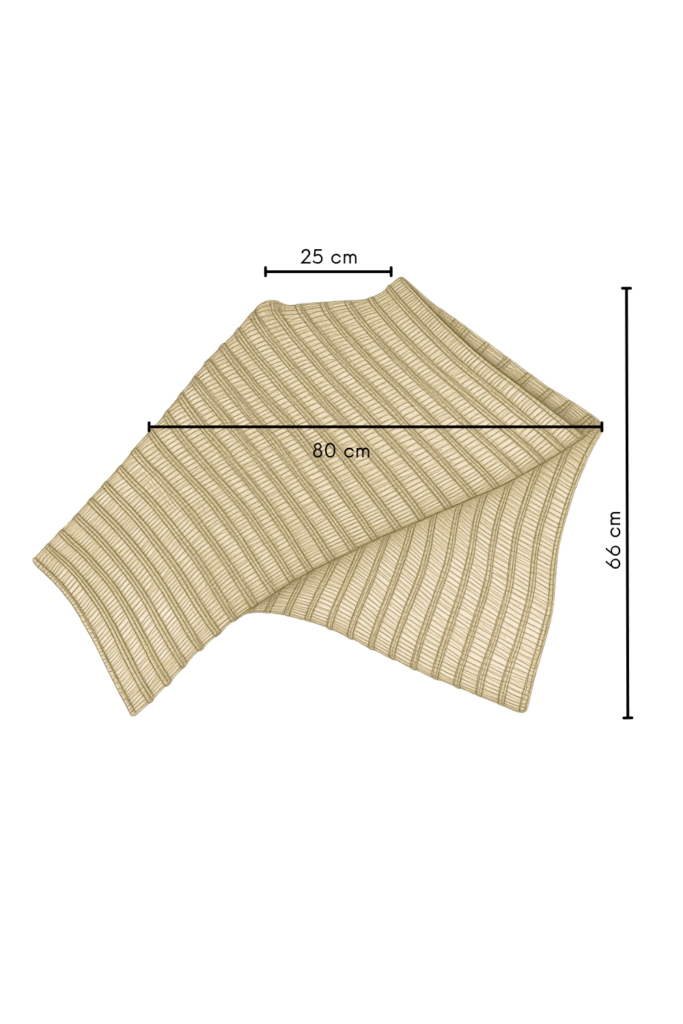
The poncho is one size and has approximate final measurements, once blocked, of:
- Neck opening: 25 cm (10 in)
- Width: 80 cm (31.5 in)
- Length: 66 cm (26 in)
A little further on I’ll show you how to customize these measurements to make your poncho bigger or smaller, but first let’s see how it is built so you understand it better.
CONSTRUCTION: PANELS
This poncho is made from two rectangles of different sizes:
- FRONT PANEL (40 cm / 16 in wide x 80 cm / 31.5 in long)
- BACK PANEL (50 cm / 19.5 in wide x 70 cm / 27.5 in long)
The starting chains determine the width of the panels and the number of rows determines the length.
The panels are then joined in a very special way to create a garment that is asymmetrical yet balanced.
1. FRONT PANEL
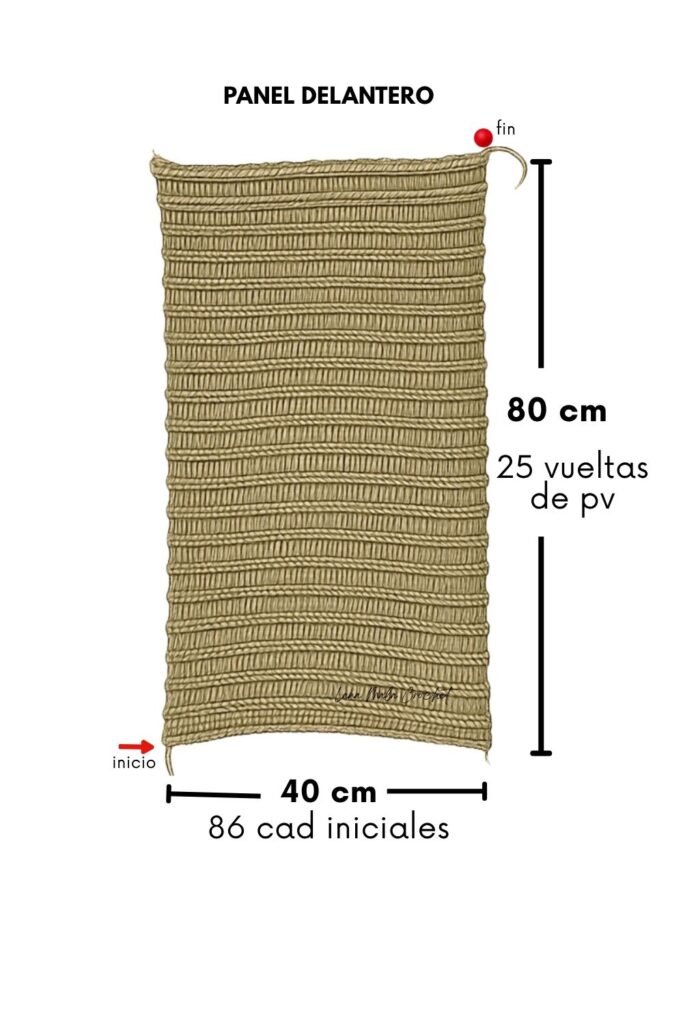
FRONT PANEL
Row 0 (start): ch 86, ch 1, turn.
Row 1: sc 86, turn.
[Row 2: vs 86, ch 1, turn.
Row 3: sc 86 (locking row for the vanilla stitches), ch 1, turn.
Row 4: sc 86, turn.]
Rows 5 to 25: repeat the sequence from [ to ]. Fasten off.
2. BACK PANEL
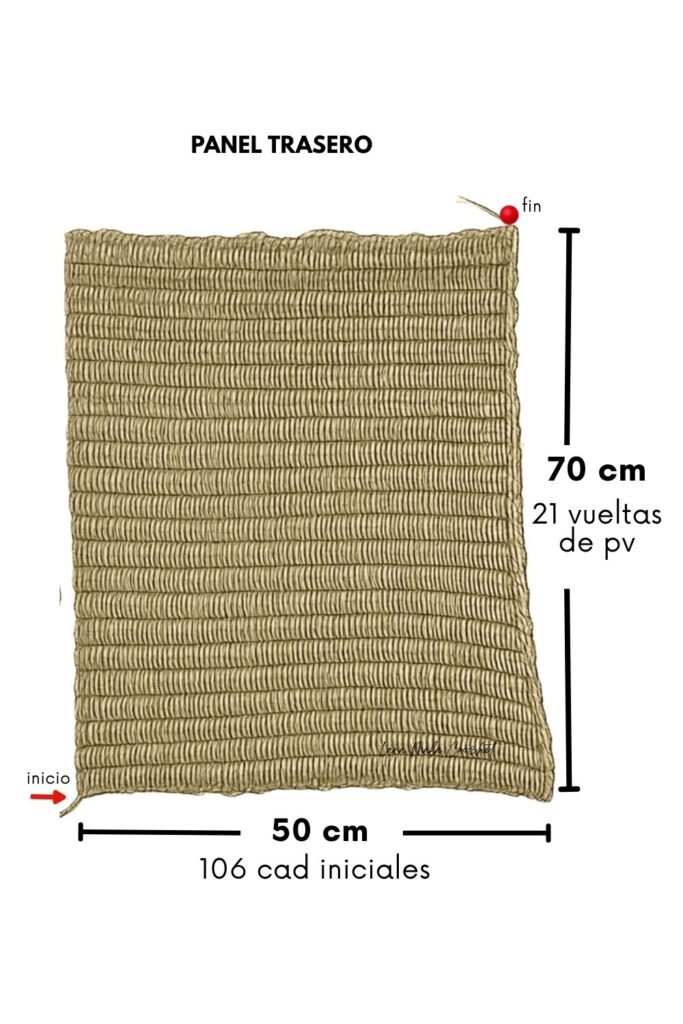
BACK PANEL
Row 0 (start): ch 106, ch 1, turn.
Row 1: sc 106, turn.
[Row 2: vs 106, ch 1, turn.
Row 3: sc 106 (locking row for the vanilla stitches), ch 1, turn.
Row 4: sc 106, turn.]
Rows 5 to 21: repeat the sequence from [ to ]. Fasten off.
IMPORTANT NOTE TO MAKE YOUR PONCHO IN OTHER SIZES:
- If you start with more chains on each panel, your poncho will be wider.
- If you start with fewer chains on each panel, your poncho will be narrower.
- If you work more rows on each panel, it will be longer.
- If you work fewer rows on each panel, it will be shorter.
But be careful! Always respect this proportion rule: the back panel must be about 10 cm (4 in) wider and shorter than the front panel. This way you won’t lose the essence of the design, which is its asymmetrical but balanced shape.
BLOCKING THE PANELS
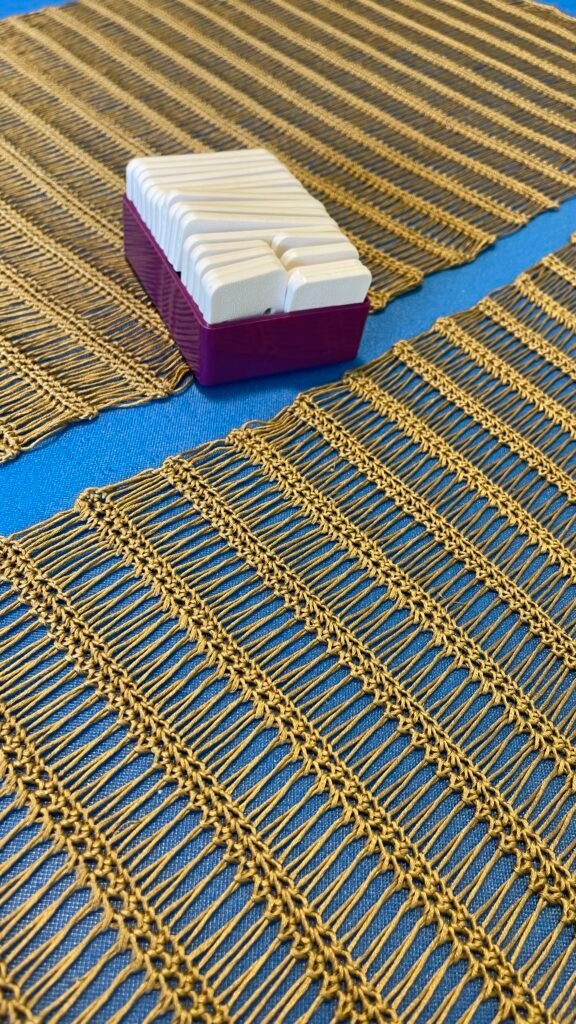
This step is very important for the vanilla stitch to reach its full splendor.
DON’T SKIP IT!
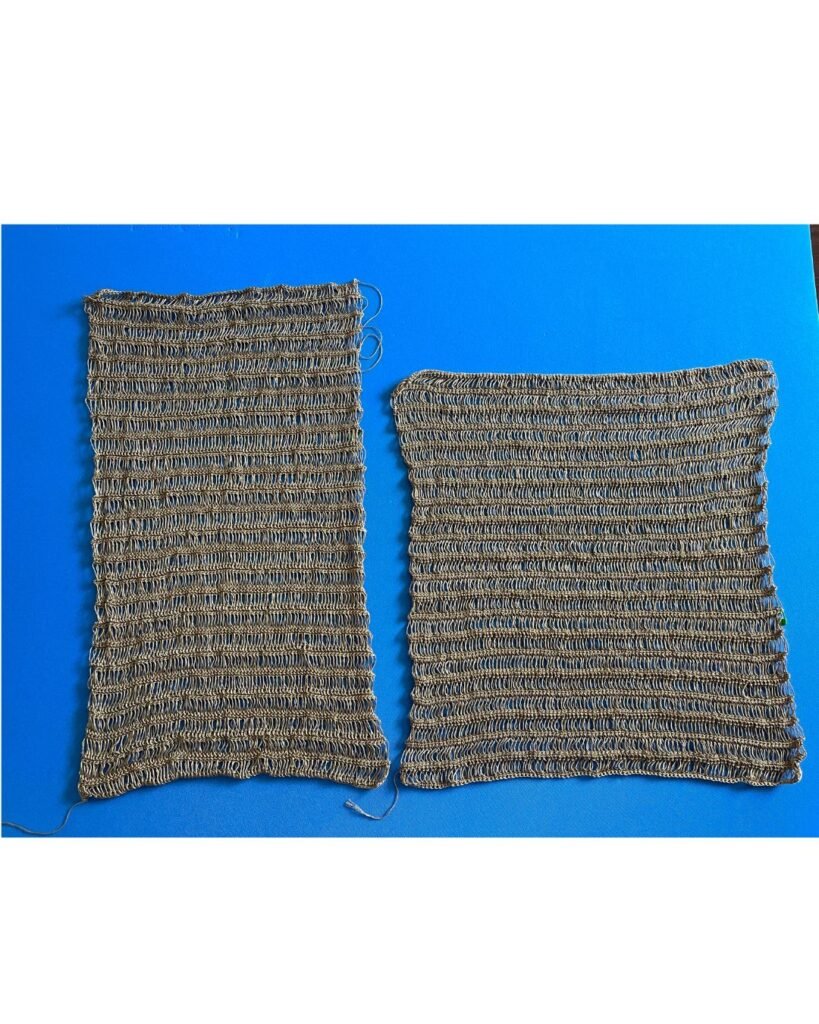
Once you have crocheted both panels, there is one very, very important thing to do: block them.
Fully submerge both panels in a basin of water. Let them soak for about 20 minutes so the fibers get thoroughly wet.
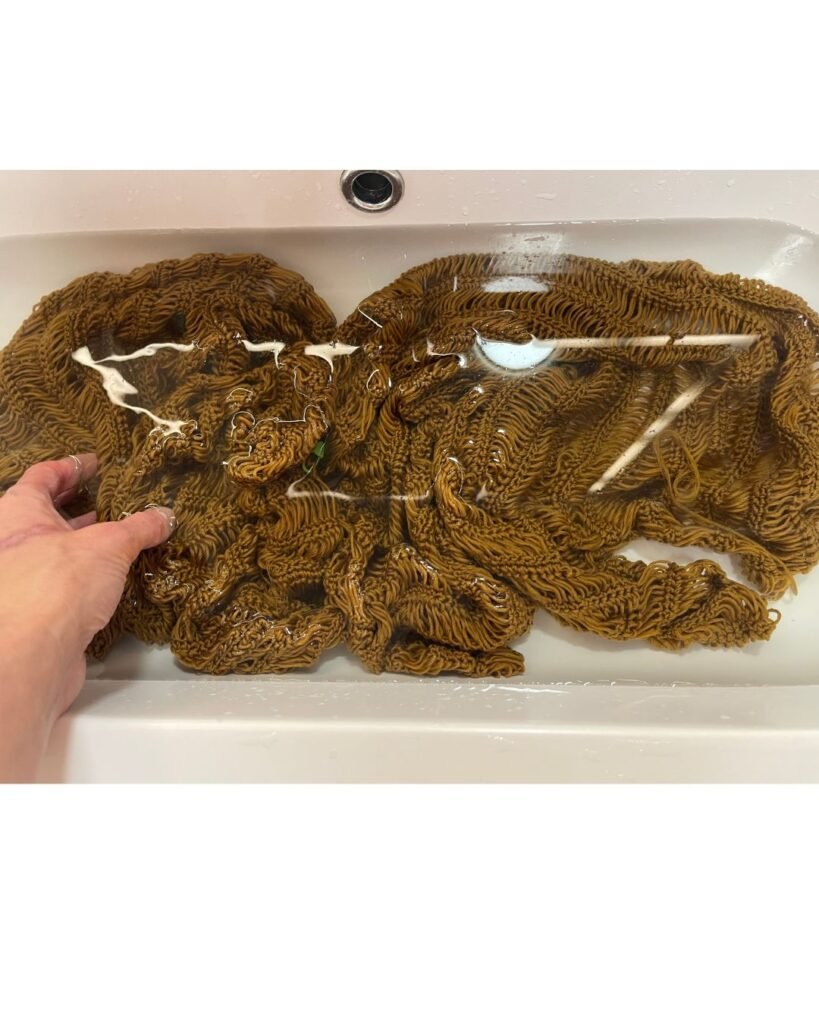
Take them out and squeeze out the excess water. You can roll each panel in a towel and press with your hands to remove as much moisture as possible.
Lay the panels on a padded surface.
Gently and evenly stretch them, securing with pins or blocking wires.
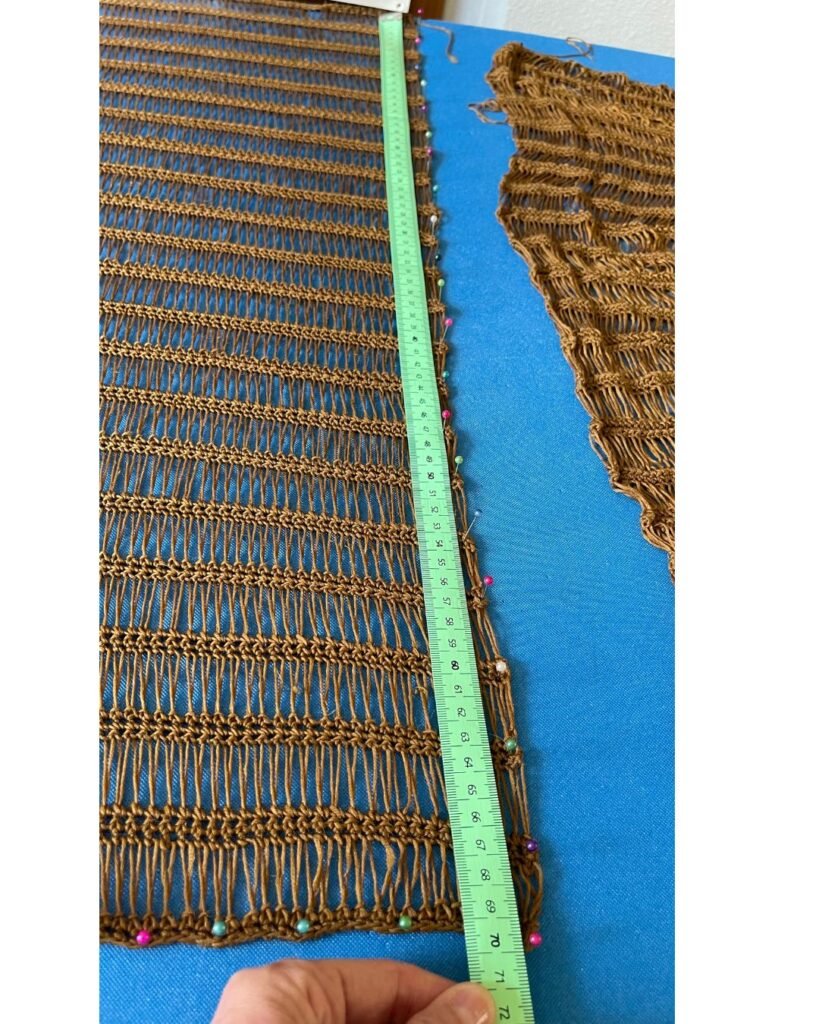
Use a measuring tape to check that you reach the desired measurements. Let dry completely.
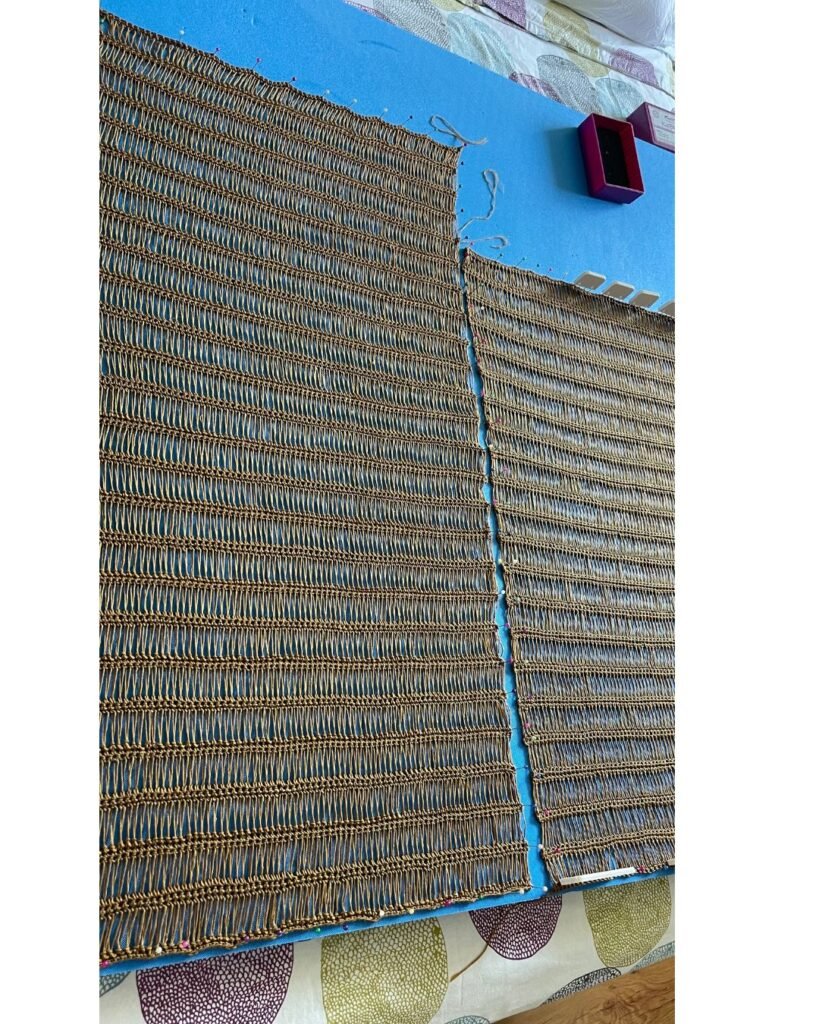
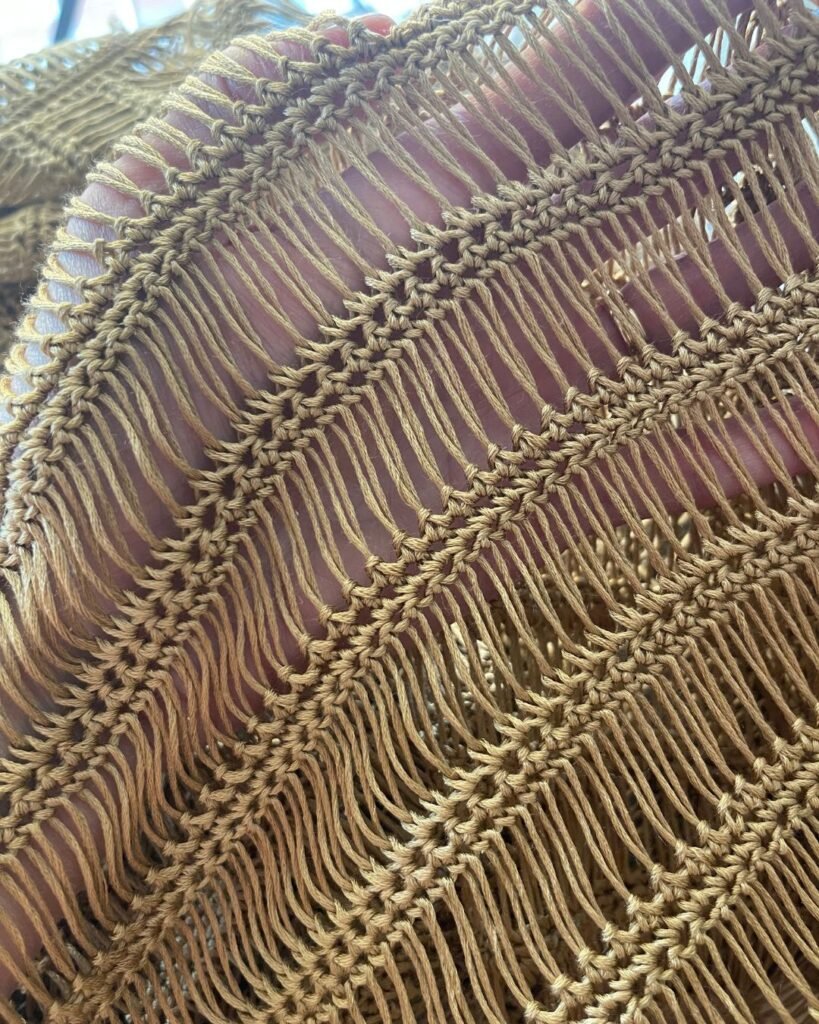
I’ve prepared a short video tutorial so you can see how I blocked the panels and use it as a reference:
ASSEMBLING THE PONCHO
Now comes the most exciting part of this project: turning the two panels into your poncho.
In the following photo-diagram I explain visually how we are going to join the two panels.
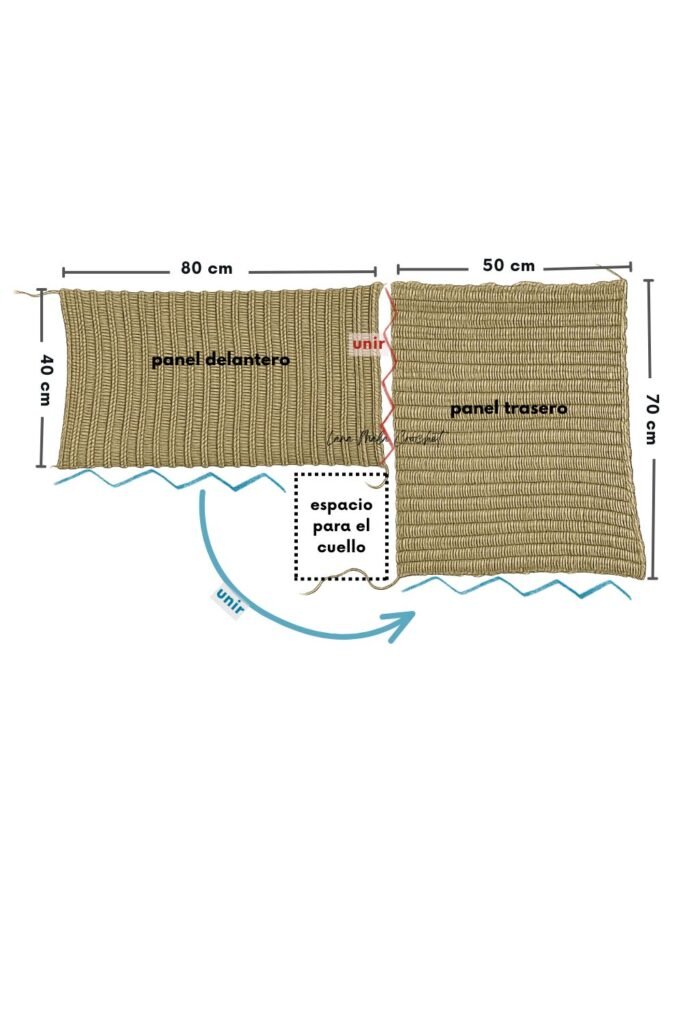
Look carefully at the direction in which you should place them: the front panel is placed crosswise to the back panel, which is placed straight. We make the joins with our own hook as follows:
First: join the two panels together following the red zigzag line.
Place markers to delimit the area.
JOIN: Insert your hook in the first marker and work 2 sc, [ch 5 or 6 loosely (equal to the length of the vanilla stitch), skip the vanilla stitch and work 2 sc (one in each sc row)]. Repeat from [ to ] to the end.
Leave about 25 cm (10 in) unjoined, equal to 8 groups of vs.
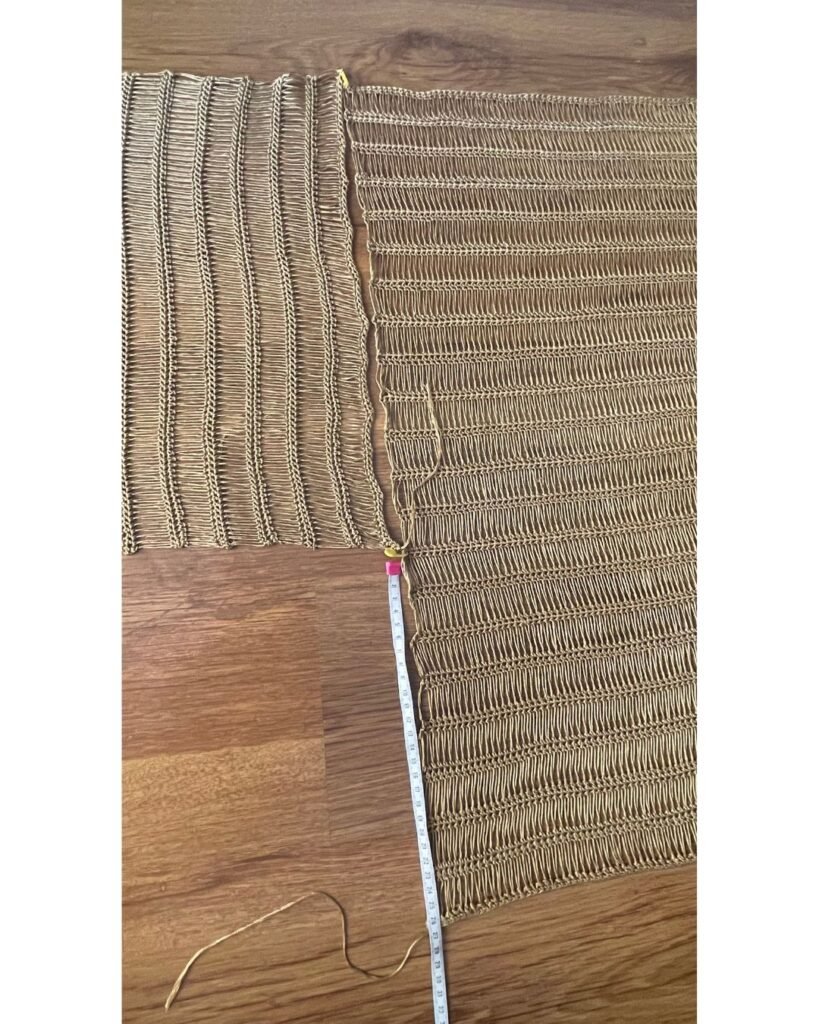
Second: join the parts marked with the blue zigzag lines, following the direction of the arrow.
Place markers to delimit the area and repeat the procedure described above in JOIN.
Again, leave about 25 cm (10 in) unjoined, equal to 8 groups of vs.
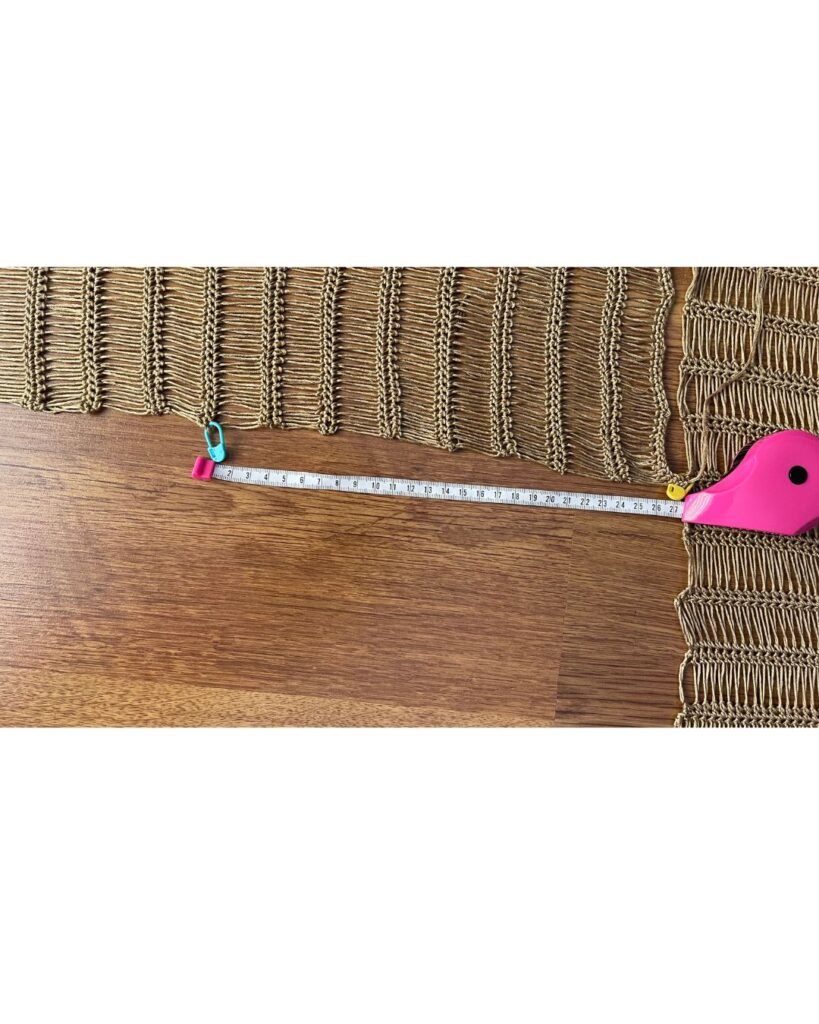
The parts you have left unjoined form the neck opening. Check that your head fits through; if not, make this gap bigger by leaving a longer stretch unjoined.
Gently block the seams so they sit nicely. There is no need to wet the whole garment again: you can use a water spray or the steam of a cool iron to shape them.
It may seem a bit complex at first but, believe me, it’s really simple. In any case, here is a step-by-step video tutorial so you can see how easy it is, with no complications:
And that’s it, you have finished your Xanath Poncho.
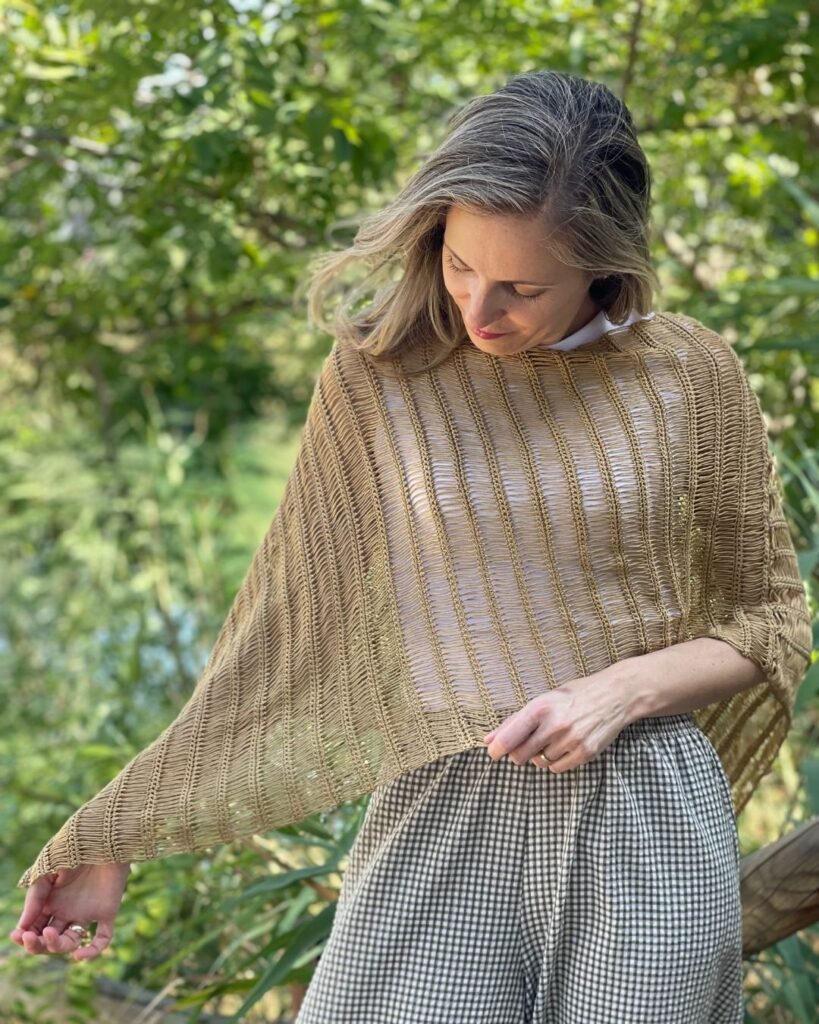
If you feel like it, leave me a comment below with your opinion, whether you’re going to make it, or any questions you may have. I’ll be delighted to help.
And once again, thank you for being there on the other side, supporting my work and crocheting my designs.
Want everything in one box? Get the Xanath Poncho Kit – Luxury Silk with the yarn for the whole project.
If you want to continue with the VAINILLA collection, here are the direct links to the shop. I’m sure you’ll love them as much as this Xanath poncho.